
The Fujifilm X-E2 mirrorless camera is an excellent choice for street photography. Some of its advantages are:
- Discrete presence — small, light, quiet, and understated
- Advanced features — film simulations, and in-camera developing
- Varied lens options — native and adapted, including rangefinder lenses
- Intuitive operation — simple, direct and “film-camera” like
The Fujifilm X-E2 is capable of producing superb image quality, straight out of the camera.

The following describes in some detail, one photographer’s approach to photography in the urban environment. It is not meant to be a “How To” guide, but rather an exercise in the free exchange of ideas. My methods can be quite idiosyncratic: extensive use of from-the-hip-shooting, and film simulations with “cranked-up” settings, for example. Please be aware that there are many styles, approaches and preferences for street photography, each with its own rationale and validity, and some other advice might better suit your personal street shooting goals.
Part 1 Equipping the X-E2 for the Street
The X-E2 body straight out of the box has many desirable street assets such as being compact and discrete. However, it can further benefit from a few customisations and accessory choices. This is my modified X-E2.

Bare body weight (without customisations) was 355 gms. With added components the weight is 508 gms (without lens).
[ 1 . a ] Combined L-bracket extended grip
This third-party aluminium L-bracket and grip is my main customisation.

It extends the finger grip at the front, and is the key to being able to hold the camera with one hand, for long periods of time without fatigue.

I typically don’t use tripods for street work, however, the integrated horizontal and vertical Arca plates of the L-bracket are useful for standing the camera on the ground, or any other suitable flat surface, in either orientation. This enables very low shutter speeds, and is particularly useful for pinhole and zone-plate photography.

Also, the grip and L-bracket can act as a crash-bar for the camera body, which can be a useful thing on crowded streets. The grip is designed to give ready access to all access covers, and can essentially be left on the body permanently. Search: XE2 QR L Bracket Grip. Price: US$24 AU$30 €20. (Aug 2016).
[ 1 . b ] Wrist strap
I use a leather wrist strap with a slide-along loop constrictor.

The wrist strap gives security. Even if I lose my grip, the camera can’t fall. Furthermore, it avoids the possibility of a grab-and-run incident.

Search: Leather Camera Wrist Strap. Price: US$2, AU$3, €2. (Aug 2016).
[ 1 . c ] Soft release button
This gives the shutter release a little more prominence, and makes it a bit more tactile, which is useful if I shoot in vertical orientation, and release with my thumb.
At the same time, it helps keep the cable-release thread clean, for when I want to use a cable, which I typically do for pinhole and zone-plate photography.

Search: Metal Soft Shutter Release Button. Price: US$2, AU$3, €2. (Aug 2016).
[ 1 . d ] Hot shoe cover
This helps to keep the hot shoe contacts clean.

The bubble level also assists with leveling for waist-level or ground level shooting (in cases where the finder is not being used). I mainly use it when doing horizontal-orientation waist-level shots to enable me to point the lens slightly up or down, depending on the composition requirements.


Pointing the lens up or down changes the perspective and also the dynamics of the scene.

Search: Hot Shoe Protector Bubble Level. Price: US$1, AU$2, €1. (Aug 2016).
[ 1 . e ] Toughened glass LCD protector
I like not having to worry about the LCD screen getting scratched, including scratches from cleaning.

If the glass ever becomes damaged, you can simply remove it, and apply a new one. Search: XE2 Self-adhesive Glass LCD Screen Protector. Price: US$13, AU$17, €12. (Aug 2016).
[ 1 . f ] Hanging ring
I added a hanging ring to the unused strap lug on the left side of the camera body. This helps in situations where I have to let go of the camera to do other things (like get out another lens) and I find that I don’t have enough hands.

The leather apron under the ring is to avoid scratching of the camera body by the carabiner, and also to avoid the ring rattling.

I can use a carabiner to hang the camera from a D-ring on my camera bag or belt.

If there is nowhere to sit down, this hanging ring makes lens change-overs faster, safer and more convenient.
[ 1 . g ] Choice of Memory Card
I try to use the fastest cards that the camera can take. This assists with fast buffer clearing, and avoids missing shots due to a full processing queue. Prefer Speed Class 10, and UHS Speed Class 1 or 3, SDHC cards, from a reputable brand.


I find that for the X-E2, a 32 Gb card suits my purposes best, as it is a good match for my number of shots per battery. Shots per battery charge will be addressed in section [3.a].

I always change card and battery at the same time, regardless of how much space or power is left on either of them. That way, after a change, I can have realistic expectations about how much uninterrupted shooting I can do.
Part 2 Lens Selection
[ 2 . a ] Suitable Lenses
With the APSc sized sensor of the X-E2, you might choose between 35mm and 21mm (or even slightly shorter) focal length lenses, for street work. Primes are usually preferred to zooms, because they are smaller and lighter, they are not subject to zoom-creep or zoom-slippage, and the optics are optimized for one specific focal length. As a short registration distance mirrorless camera, the X-E2 can mount almost any lens, providing you have the correct mount adapter. Therefore it can use not only the extensive range of native X-mount lenses, but also a large number of adapted manual lenses.

The X-E2 has the ability to mount adapted rangefinder pancake lenses, which is particularly useful, due to their compact size.

If you do mount a non-auto-focus lens on the X-E2, you have to set menu item “SHOOT WITHOUT LENS” (Shooting Menu, Page 3) to ON. I just leave it on all the time, even when using auto-focus lenses.
[ 2 . b ] Going Manual
I often do shoot-from-the-hip photography. Unless you are using a Twin Lens Reflex camera, or working from a tilting back screen, then hip level shots will essentially be finder-less (view finder not used). This fundamentally changes your lens requirements. Focusing will be preset, probably zone focusing, and electronic focus point settings have little relevance. For preset focus methods, you could use one of the Fujifilm or Zeiss auto-focus lens set to manual mode, or alternatively a manual-only lens. My street preference is for the latter. I won’t say any more about the auto-focus lenses, since there is plenty of information available elsewhere. The following chart gives a small selection of standard to slightly-wide manual primes, that I use on the X-E2.

For shoot-from-the-hip street work, an aperture ring with click stops and detented lever focusing, are excellent features which allow you to set aperture and focus by feel alone (through counting clicks).

Due to these features, along with optical performance, the Voigtländer Snapshot Skopar (25mm) is a lens worthy of special mention.
[ 2 . c ] Focal Length, Working Distance, and Field of View
Lens focal length affects image magnification, perspective, compression and field of view. Although many photographers associate field of view primarily with focal length, for people-oriented street photography, how much a person will “own” of the frame, is just as much dependent on the shooting distance to the person / persons.


The following charts are designed to address this specific consideration. The quoted ratios (eg, 1 : 1.5) compare the frame height to an arbitrary “typical” adult height, taken as “1 person height”. (I used 1.75 m as the basis for that height.) Based on the type of ratio you would like to achieve, and the shooting distance that you feel comfortable with, you should easily be able to select an appropriate focal length lens. (Note that these charts are APSc sensor specific.)

Turning the camera to a vertical orientation increases the “head-room”, so the applicable settings change. I like the vertical oriented frame because it naturally compliments the human form. You might find it useful to remember that in vertical orientation with a 24mm lens, the distance to the person being photographed is equal to the vertical height depicted by the frame. That can give you a starting point reference for making on the fly estimates, without using the chart.

VIEW THESE CHARTS AS A PDF DOCUMENT
Although you become very familiar with the lenses that you use frequently, I keep a pair of card sized prints of these charts as a ready reference for when I change to lenses I use less frequently.

As an example of using these charts, the height of the frame in the following vertical orientation shot, is more than half a person height, but less than one person height. So we would be looking at the meeting of the red and the orange bands (that is, between the 1 : 0.5 and 1 : 1 ratios). The shot was taken with a 32mm lens (APSc), so the distance to the subject would be about 2 metres, which was indeed my estimate of distance.

To get the person fully in the shot, plus a bit of space above and below, (so that the framing is not too tight, say a ratio of 1 : 1.5 ) then I can look at the yellow band and see that I would have to be between 3 and 4 metres away, for the 32mm lens. Of course, different lenses and distances will also affect the perspective of the shot. If I had used a longer focal length lens, and stood much further away, the bridge in the background would be much higher in the frame. Bear in mind that working distances will also affect depth of field. This will be addressed in section [3.e].
[ 2 . d ] Lens Accessories
Equipping the body with a lens may also entail acquiring lens adapters (if not using native x-mount lenses), and such things as hoods and UV filters (if you like to make the task of keeping your lens clean, easier).

Although many people don’t worry about a protective filter (for protection against getting dirty, not against breakage), it really is the best way of keeping your front lens in a pristine state. This is particularly important for some lenses with a very small front glass, where trying to clean it could be difficult, and you run the risk of causing damage.

For these reasons, I fit all of my lenses with a good multi-coated UV or similar filter, if available, and only ever clean the filter, not the front lens. In a city environment, and especially with the added factor of salt-air in a harbour-side city, air-deposited particle build-up on the front-most glass, can be significant over time. Its main effect is to reduce sharpness and contrast.
[ 2 . e ] About Exif data
The Fujifilm and Zeiss X-mount auto-focus lenses write numerous items of lens information to the Exif metadata of the image files produced by the camera. This is not the case with adapted manual lenses, which have no electronic communication with the camera body. For adapted lenses, you should set the menu item “MOUNT ADAPTER SETTING” (Shooting Menu, Page 3) to the focal length of the lens being used.

That way, the focal length will be recorded in the Exif data written to the image files, however what will be missing is the aperture that was used, as well as focusing information, etc.

When using non-auto-focus lenses, I highly recommend that you keep a notebook, for the purpose of recording specific lens used (you may have more than one lens of the same focal length), as well as aperture and focal distance settings, etc, of your street photo session. This allows you to identify camera set-ups that worked well, and also provides some of the missing information that would normally be recorded in the Exif data of your images, when using an auto-focus lens.
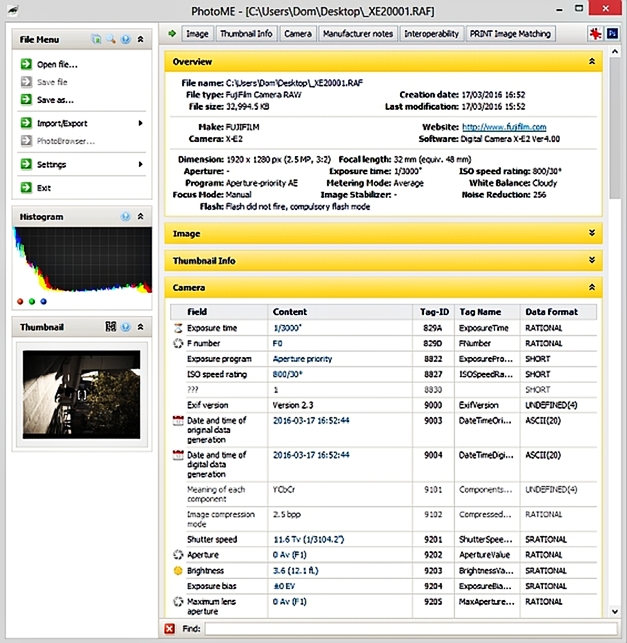
If you wish, you can later edit this information into the Exif data of selected image files. I generally use a stand-alone utility, such as either ExifToolGUI, or PhotoME.
Part 3 Camera Menus & Controls Setup
The various camera options and settings can affect both camera operation and the rendering of acquired images. A poorly set-up camera can be frustrating to use, and produce unsatisfying images leading to unnecessary post processing.

If the camera is new to you, you should fully read the manual, while trying out each of the cameras features. Be aware that, except for the body design, an X-E2 with Firmware version 4 is functionally the same as the X-T10. So, if you want to delve more deeply into the X-E2’s capabilities, the recommended book would actually be Rico Pfirstinger’s X-T10 book. It is available via this link – http://www.rockynook.com/shop/photography/the-fujifilm-x-t10/?ref=21 , and you can use this coupon code, XPERT40 , to get a 40% discount.
[ 3 . a ] Power Saving
Mirrorless cameras are relatively power hungry (compared to DSLRs), so you may want to conserve power. My personal recommendation is to use these settings.

Regarding High Performance Mode, it is generally recognised that the camera responsiveness benefits far outweigh any power usage disadvantages. Besides the above setup, another factor which can lead to enhanced power efficiency, is the use of manual-only lenses, which, of course, do not consume any power.

1000+ is the number that I have been able to achieve, but due to differences in “Mostly Off” implementation and also battery condition, you may not achieve the same results.
[ 3 . b ] Function Buttons
The X-E2 has seven assignable function buttons. A short press of a Function Button will give you direct access to the assigned function. A long press will open a menu from which you can select the function you wish to assign to that button.

The following table gives my own recommendations, which are based on experience, and allow also the quick conversion of the camera to “non-street” shooting (for example, the “preview exposure in manual mode” setting often needs to be accessed in studio shooting).

When Photometry (AE), White Balance, and Custom Settings selection, are selected via Function Buttons, the selection menu is superimposed over the EVF or LCD view, so that you can see exactly what the effects of each option will be.

That is why, although Custom Settings can be selected from the Q menu, it is more informative to select them from an assigned Function Button.
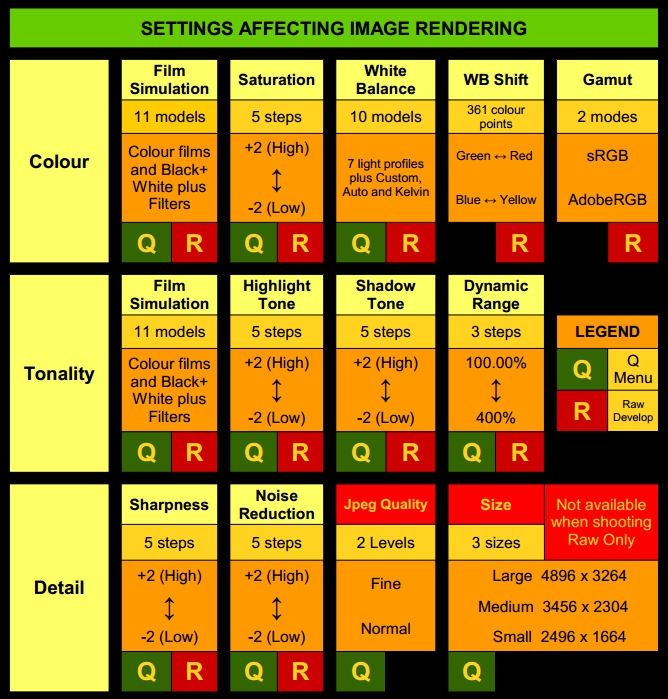
[ 3 . c ] Image Quality
Even if you only want straight-out-of-camera Jpegs (Fuji’s Jpeg engine is highly regarded), I still recommend that you always shoot Raw files, selecting either “Raw” or “Raw + Fine”. When you review the shot, you will see an embedded Jpeg image that is included in the Raw file, and that embedded Jpeg is rendered according to the settings with which the shot was taken. But the Raw file also contains all of the original unprocessed image data. Having a Raw file allows you to virtually “re-shoot” the scene after the fact, because you can develop the Raw information (Fuji calls it Conversion) to produce a new Jpeg image as many times as you like, with freedom to change the settings as shown in the following chart. This re-developing is not possible from a Jpeg file, so shooting Jpeg only, locks out the in-camera developing (Conversion) functionality. However, “Jpeg only” still has its uses; — for instance, when I shoot time-lapse sequences, I shoot Jpeg only.
To answer the question of whether to shoot Raw only, or Raw + Jpeg, I suggest that you look at your expected “keeper” rate. For low keeper rates, such as 10% or less, I would shoot Raw only, and use in-camera developing of only selected Raw files. However, for high keeper rates, such as 80% or higher (think about a wedding photographer), then because Fuji’s Jpegs are so good, Raw + Fine (that is, best quality Jpeg) may be the most efficient way to proceed. For urban photography I shoot just Raw only, and then convert selected images to Jpeg files. Since I have said a lot about producing Jpeg files in-camera, I would like to clarify one thing: — If I am going to produce a fine-art print from one of my shots, I will process the Raw file on the PC, using an external Raw converter. Although I have both Lightroom and CaptureOne, I usually use RawTherapee and then Krita (which although intended mainly for concept artists, digital painters and illustrators, happens to work very well for photography).
[ 3 . d ] Q button settings and Film Simulations
From the Q button, I can access all of the image rendering options, and I can also select or modify one of seven sets of Custom Settings. My preferred strategy is to assign a different Film Simulation to each Custom Presets bank. It is worthwhile becoming familiar with the particular characteristics of the various Fujifilm Film Simulations, so that you can better select different Film Sims according to your visual intent.

The difference between the various Film Simulations can be quite subtle. So, based on the above table, I have set up seven Custom sets, but with a further emphasis (or slight exaggeration) on the particular characteristics of each Film Sim. In this way, the suitability of a particular Film Sim for a specific scene can be more easily determined. Remember, the Raw data itself is not actually affected by these adjustments, only the embedded-jpeg image, so you can always wind-back that “emphasis” when you convert to Jpeg.
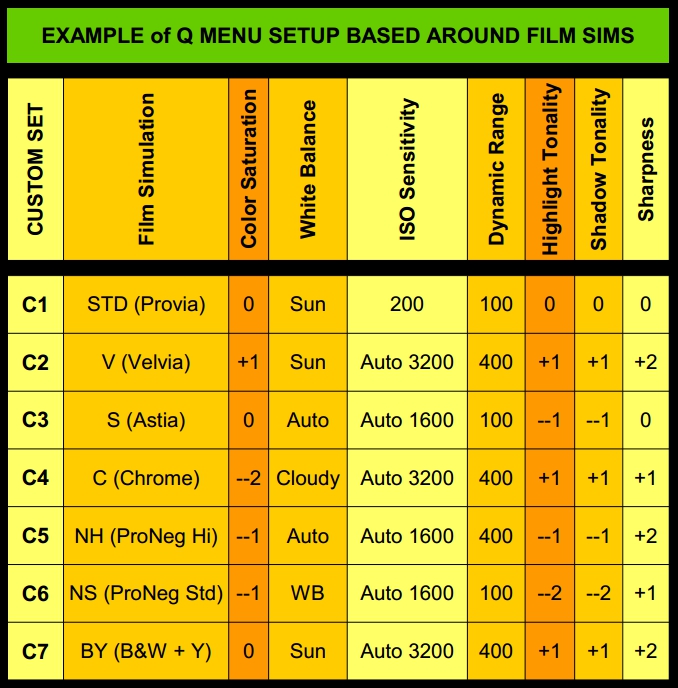
The following is an example of typical settings that I might use for my urban photography: I like my images to be warm and inviting. Since my intention is artistic rather than than documentary, I am not afraid to alter colour and tonality in order to establish the mood and sentiment that was felt at the time of image capture. My preference is for a palette leaning towards sanguine, with low saturation and understated hues, and drama from starkly contrasted shadows and glow, with the feel of an old, classic film that has its imperfections. This intention is reflected in the following Q menu settings.

Furthermore, the Cloudy White Balance has been shifted towards the Red and Yellow in order to give a strong warming effect, similar to the use of an 81C or even 85C Warming filter.

Later when I review my shot, it is displayed according to these settings. Note that my “virtual warming filter” plus a Skylight(1A) filter on the front of the lens, has removed any trace of blue from the sky.

However, if I think the result has been pushed too far, I can always re-develop in-camera according to different settings, because I have all the original capture information in the Raw file.
[ 3 . e ] Focus, Aperture, and Depth of Field
In my various types of photographic work, I use both manual and automatic methods, depending on the task. For shooting in the street I typically use Zone Focusing.

As a result, my aperture is often somewhere between F8 and F11. I recommend not going beyond F16 where, on an APSc sensor, you can start to experience the onset of diffraction effects. The depth of field scale may not be reliable on adapted lenses, if they were designed for 35mm film format. I prefer to use a table specially designed for APSc format.

VIEW THIS CHART AS A PDF DOCUMENT
The Depth of Field specifies a zone within which everything should be adequately in focus. As a general rule, the distribution of that in-focus space is considered to be one third in front of the set focal distance and the other two thirds behind it.

By using small apertures and longer focusing distances, you can easily achieve a very deep in-focus zone. However, I prefer to work at more “intimate” distances, and so the in-focus zone becomes more shallow. You need to learn to estimate distances well, if you want to use very shallow zone focusing. For daylight photography, I don’t require fast lenses. However, for night-time photography, I often use fast or even ultra-fast (F0.95 and F0.85) lenses.

Night shooting might require wide apertures to make best use of the available light, so you just have to set the focus distance correspondingly further away to get a deep enough focus zone.
[ 3 . f ] Shutter Speed, ISO and Dynamic Range settings
I am treating these together, because their settings are very interdependent. I generally set the Shutter Speed dial to Auto, and use one of the Auto ISO settings. [Please note that each bank of custom settings can have its own set of Auto ISO settings.] Given the sensor’s ISO invariance (up to 1600 ISO), and the benefits of Fuji’s extended dynamic range, I don’t feel compelled towards shooting at base ISO. The strategy behind the following chart is based on the assumptions that better lighting allows lower ISO and faster shutter speeds, while poorer lighting needs higher ISO and slower shutter speeds.
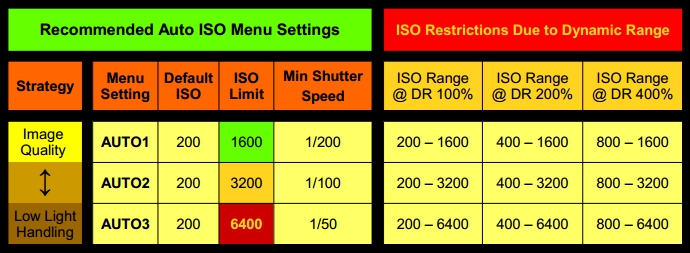
I always consider ISO settings in the context of Dynamic Range settings. I typically shoot in very contrasty situations where extended dynamic range settings can help avoid loss of detail in the highlights (except the Sun, of course, which should be blown out). One of the problems of doing a lot of from-the-hip photography is that you don’t have the opportunity to look at the histogram, which would normally be a good guide as to whether or not extended dynamic range settings were required. Since I don’t see the histogram, I just routinely shoot at 400% dynamic range, because you can always reduce the DR% in development, if necessary. So, if I shot at DR 400%, but the EV range of the scene didn’t require it, then I can develop at 200% or 100%, which can have the effect of improving nuances in the tonality. However, the reverse is not true: — you cannot increase the DR% in developing, above the DR% at which the image was shot. So basically, shooting at DR 400% gives me more development options (different tone mapping variations), but at the cost of limiting my minimum ISO to 800. I find that an acceptable trade-off.

[ 3 . g ] Electronic Shutter
I use the Electronic Shutter (ES) most of the time. For me, its advantages (silence, no shutter-induced camera shake, and reduced power consumption) outweigh its disadvantages. However, you should be aware of some strange effects that can result from use of the Electronic Shutter. Due to rolling shutter effects, movement during exposure (either camera or subject) can cause distortion, which might display as stretching, warping or smearing. The remedy is, of course, to practice a steady hand.


Also, some artificial lighting will cause banding when the Electronic Shutter is used at certain shutter speeds, due to interaction between the readout characteristics of the ES and the phase nature of the AC power supply. Banding is very characteristic of shooting under fluorescent lighting, but incandescent lighting is generally exempt from these effects.


As a rule, banding becomes worse (bands are darker or more underexposed) as the shutter speed gets higher. To avoid the bands, you may have to select the shutter speed manually. The shutter speeds which do not produce banding are dependent on the supply frequency of the local AC power grid (specified in Hertz, cycles per second).

If banding does not show the typical Signature (number of bands), then it is probably due to some other phase function of the power, such as the PWM (pulse width modulation) used to drive some LED lighting, and you may have to determine appropriate shutter speeds experimentally. Alternatively, you can simply switch to the Mechanical Shutter, which does not display banding problems.
[ 3 . h ] Exposure Compensation Dial
I regularly set the exposure compensation dial on the basis of the time of day. Otherwise, the Auto-Exposure will try to increase the exposure for twilight and dark scenes, possibly giving them an un-natural look, and loosing their ambience.

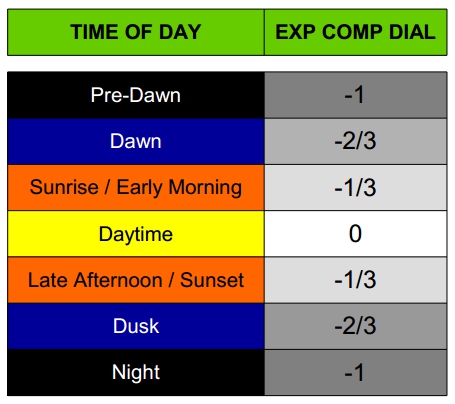
The un-adjusted Auto-Exposure can also lead to slower shutter speeds and higher ISO settings than are actually necessary.

At night you already have the problem of low available light, and if you’re trying to use higher shutter speeds for moving shots (in the above shot, both the subject and the photographer were moving towards each other), then the advantage offered by a 1 EV reduction in exposure, is very welcome.

Beyond this, I might adjust the exposure compensation for a particular shot, not to normalize the exposure, but to bias it, such as, to emphasise shadows or highlights.
[ 3 . i ] Drive Mode
Single shot mode is my usual setting, but if I’m trying to capture a scene where people are moving, then I sometimes use Continuous Low mode, which gives you the opportunity to select the best of several shots.

I keep release times short (1 second or less at a time) and I generally don’t use Continuous High, which can quickly fill the buffer, and your card. The following are typical results when using the electronic shutter, but be aware that they can be affected by such factors as ambient temperature, and the specific card being used.
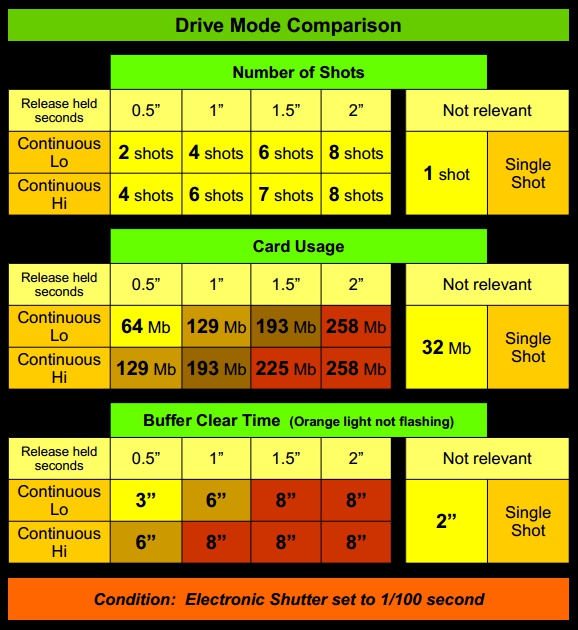
If you use Continuous mode, I recommend that you have the drive indicator show on your custom screen setup. Otherwise you may forget that you have it engaged, and then get a surprise when your card is suddenly full, way ahead of when you would normally expect.
[ 3 . j ] Metering (Photometry)
I generally set the metering to Averaging. I find that this gives better shot-to-shot consistency for a series of shots. I also feel that it handles scenes with a wide dynamic range better than the default Multi metering mode, since it tends not so affected by the brightness distribution of the scene.

However, if you have Photometry set to an assignable function button, you may find it useful to preview how Multi and Average modes are handling the scenes that you are shooting, and select the one you consider to be exposing best. As a general rule, Spot metering is not appropriate for no-finder and shoot-from-the-hip photography, since it presupposes that you can locate a target on a precise part of the scene.
In Conclusion
There are, of course, many other settings available on the X-E2, but I have addressed only those that I consider most relevant and important for candid photography in an urban environment. If you are new to urban photography, then this article may suggest some useful starting points. Even if you are a veteran “streetog”, I hope you may have found some points of interest.

Either way, your image results will depend not only on your continuing practice and deep exploration of this photographic genre, but also on the personal choices that you make. I hope that you find the X-E2 the same excellent street tool that I have found it to be.
Fujifilm X-E2
It takes me many days or even weeks to produce an article like this. In order to give you a distraction-free experience, I like to keep the site free of advertising, but it means I get no payment for that hard work. If you would like to support me in continuing to produce high quality articles like this one, please consider donating, even a dollar. Thank you.

_______________________________________________________________
All images © 2013-2017 Dom Varney
 Images on this page are licensed under a
Creative Commons Attribution-NonCommercial-NoDerivatives 4.0 International License.

Thank you for all the work that went into this.
On the verge of moving to Fuji as my number 2 camera to my M9 as I need autofocus (in the knowledge it may dominate my useage 😀).
This piece of work looks like it will become my go to reference guide as currently I’m a bit menu-scared!!! So – thank you so much for all this practical detail – I hope to follow up this comment after some practice!
Can’t wait to try my leica glass on (I expect) an X-E2 plus firmware upgrade.
To Don
Hi. Great article. Where exactly did you get wrist strap mentioned in it?
Hi. Thanks for the comment. I bought the wrist strap on Ebay, from a Hong Kong seller (forgotten who). There are plenty of Chinese sellers offering this product. Search for “leather wrist strap” in the Camera category. If you don’t mind the several weeks wait for delivery, you can easily find them for under US$2.
Very nice article, full of useful info !
Thanks 🙂
Thanks Thomy. I’m glad that you found it useful.
I’ve recently retired from a career in photography and have sold of most of the more expensive “gear”. I have kept the sigma Merrils and a Fuji XE-2 and XE-2s (it was going really cheaply and I couldn’t resist having a spare, old habits die hard). I’m using my old MF Nikon lenses presently and am very happy with the results. I’m pretty sure I could get a reasonable A2 print. My plan was to try and shoot it as if it were an old film camera, with the benefit of being able to change the film, shot to shot. I will have a Raw as well. When I had the Fuji s3 and then s5, I loved the increased DR feature. On recent cameras, I haven’t seen a need for it and if I did, I’d underexpose and push up later in post. It looks like you’re doing the opposite, shooting with a 2 stop higher DR and then turning it off should you not want it. Anyway, I’m rambling. I noticed your comment on shooting with “average” photometry setting. The Matrix meter option only really works with the lens apertures open (my opinion). As soon as you start to stop down, the brightness values change, as di the relative contrast values, both of which are used by modern matrix metering systems. I noticed it was throwing off exposures. I switched to average and all was fine again.
Thanks for the article. All best Si.
Hello Si.
Thanks for your comments. I can definitely identify with your plan to shoot as if using an old film camera. And, you are right that my normal setting of DR 400%, and then pulling back later (if necessary) is in a sense back-t-front. I mainly advise that, for the purpose of “in-camera” conversions, because from 400%, you can adjust back to 200% or !00% (normal), but if you shoot at 100%, you’re stuck with it (at least in terms of in-camera developing). I was interested in your comments about “average” photometry. Strangely, or maybe not strangely at all, I tend to use average more often than the other (non-spot) photometry strategies, because it tends to consistently deliver what “I” consider “correct” exposure. I had a look at your site. Some very interesting things there! Anyway, thanks for reading and commenting.
All the best. Dom
Really interesting information and impressive photos.
I have a Fuji X-T1 and am thinking to get this Voigtländer 25mm after reading your article.
I would like to check with you if with the L39-FX adaptor,
1) the focus scale on this lens is still accurate?
2) the DoF scale is still usable?
Regarding DoF, usually, when using a full frame lens on an cropped sensor, the depth of field increases, so can I say that with this lens, the DoF scale is still usable except that the actual DoF is larger than what’s indicated on the lens. Am I right?
Thanks in advance,
Zixiong
Hello Zixiong. My apologies for this very late response.
The Voigtländer 25mm Snapshot Skopar is one of my favourite lenses, and a very nice focal length for street photography on the APSc sensor.
The L39-Fx adaptor that I have (unbranded) does give the appropriate flange distance, so that the focus markings are accurate. I have used a few L39 adaptors and have generally found them accurate. I would, however, recommend that you get a “two-piece” adapter, where there is the outer body with the Fuji X bayonet, and an inner ring with the L39 thread, which can be rotated and locked in place by three grub screws. That will ensure that you can get the scales and index markings mounted at the top, and properly centered,
You are correct that the depth of field scale (designed for FF sensor or film) is changed with the APSc sensor, however I consider it to still be usable. I usually just apply a 1 stop compensation. So If I set my aperture to F8, I look at F11 on the depth of field scale. Having said that, what I generally do, when I am in the location where i intend to take shots, I take a few test shots using my intended zone-focusing settings, and review them with magnification, to ensure that I am getting the focus (or blur) that I am after. (Just to remind you, you will need a jpeg shot to be able to review it at 100%).
I presume that the Snapshot Skopar is only available now as a used lens, but I think there are ones available in very good condition (mine was mint).
I hope this information is useful to you.
Thanks for reading! (And best wishes for the coming year).